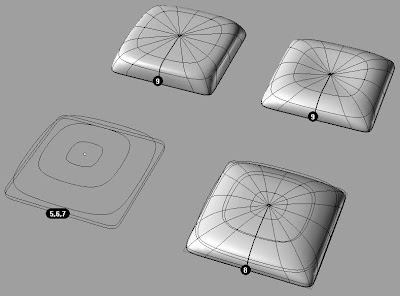
- A simple curve works best.
- Copy vertical 3 times.
- Leave the base curve and at least one vertical copy up from it alone.
- On the next curve use Smooth in X nd Y directions only a few times to smooth out the base shape somewhat.
- Copy this curve vertically again and smooth it some more, as well as Scale2d a bit smaller.
- Scale2d another copy
- Place a point object in the center of the smallest curve.
- Loft all of the curves to the Point, making sure the Loose option in Loft styles is chosen.
- The shape can be varied by the level, number and position of the curves- make sure the smallest curve in the middle and the point object are always coplanar. You can also turn on the points of this surface and move rinmgs of points up ands down to edit the shape. Again be sure the middle point and the next ring of points stay coplanar
To make the pillow a little softer looking:
- OneLayerOn
- Bend a Pillow layer.
- Zoom extents
Red curve= Current shape
Note: These curves are the same length for minimal distortion of the surface.
Use Flow (Transform menu>Flow along curve). Red is the orignal 'backbone' Cyan the new 'backbone' curve. Join after Flowing.

Rhino Newsgroup


No comments:
Post a Comment