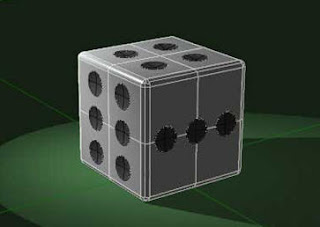
- Turn on snap by highlighting "snap" on the bottom toolbar.
- Create a polysurface box (command "box") that is 10x10x10 units in size. You can use "Shade" and "RenderPreview" at any time to see how the design is coming along, try it now.
- Type in "FilletEdge" and select all 12 edges of the box. To change the default radius from 1.0 to 0.5, type in .5 and press space. Press enter to perform the fillet.
- Type in "Circle" and create a circle. Make this roughly 33% the size of the box. You can reposition objects wherever you want by highlighting them and left-click-and-drag. The example circle is hidden, to see it type in "Show".
- Type in "Scale2D" and squish your round circle along one axis to make it look like the demonstration. This is necessary because the indentations in the die are not exactly circular, they are more flat. You may have to temporarily disable snap to do this.
- Position the squished circle close to the surface of the die (but not touching) and center it on that side using all viewports. This will become the "1" side.
- Turn Snap off and Ortho on, this will help us place the circle with more precision. Notice the demo circle intersects the surface of the die by approximately two units in cross-section. Duplicate this, then turn Snap back on and Ortho off.
- Now that the "cutter" is positioned, it is a simple process of moving it and performing boolean operations to create the dents. Type in "BooleanDifference" and select the die and press enter, then select the circle and type in "d" plus a space to toggle DeleteInput to NO, then press enter. The intersecting area of the cutter and die is removed from the die and both objects remain.
- Side one is nearly done! Now rotate the box 90 degrees on any axis so we can get to another side, do this with the "Rotate" command. Notice how the dots are spaced on the die, and position the cutter to emulate this on your version. Perform more boolean differences and cut out the remaining indents on each side. Right-clicking in the viewport repeats the last command used, so try that instead of typing "BooleanDifference" a million times.
- Now that the die has the correct indentations in it, we need to break the surfaces up so they can have different materials applied to them. Highlight the die and type in "Explode," this splits the object up into its basic surfaces. Select all the dot surfaces, add them to a group with the "Group" command, and hide them with the "Hide" command. Then select all the exterior die components by dragging a selection box around the whole shape, careful not to select the cutter. Type in "Join", and the surfaces are recombined into one polysurface, minus the dots. Use "Show" now to unhide the dots.
- To assign the surfaces some materials, select the dots and press F3. Under "Layer," change this to the first colored layer and press enter. Ignore the colors. Select the Die and change its layer to #2. Right-click on "Default" on the bottom toolbar, this brings up the layers control panel. Here you can rename the layers and assign them specific materials. Make the die layer white-ish, and the dot layer dark-ish.
- Add a spotlight, table surface, and adjust render settings to your taste. Click in the Perspective viewport to make it active and type in "Render" to render the finished scene!
- Mark Rhino Newsgroup

No comments:
Post a Comment