The shoe main body should be generated as shown in the attached file. The shape in the attached file is not ergonomically correct.- Facundo
Rhino Newsgroup
1/31/07
Modeling footwear in Rhino
Posted by
Robert
at
1/31/2007
0
comments
![]()
Labels: Rhino Tutorial, tenlinks.com
Rhino Surface Comprising Array of Objects
Make a block of the original object and arraySrf that to keep file size reasonable. In this file I have a loose mesh and the NURBS surface object available as Blocks. ArraySrf the red object on the surface, say 50 by 50 pieces. Set the Normal direction in Front or Right views vertically from 0,0,0. - Pascal
Rhino Newsgroup

Posted by
Robert
at
1/31/2007
0
comments
![]()
Labels: Rhino Tutorial, tenlinks.com
1/29/07
Rhino 3D Revolve to create a housing
I used revolve to create this housing. I would like to add the thickness to show it in true 3D. It is .015" thick. How do I go about getting this?
You can do it a number of ways. I use offset curve and created a lip curve, then did revolve. If you leave one curve end open the surface will close itself when the surface is revolved.
RM Rhino Newsgroup
Posted by
Robert
at
1/29/2007
0
comments
![]()
Labels: Rhino Tutorial, tenlinks.com
Screw Thread Tutorial
Color Chart:
Grey - Construction Line/Surface
Red - Current Object in Step
Cyan - Thread Pitch Profile Line
Blue - Thread Pitch Helix
- Layout bolt cylinder diameter and profile
- Insert a line to establish the pitch length and draw your thread profile. Make sure that your thread profile extends beyond the bolt diameter line. Move the thread profile so that the middle of the minor diameter lines up with the start of your bolt profile.
- Create the thread helix to match your TPI (threads per inch) specifications.
- Copy your thread helix from end to end (this is so that you can create your disappearing thread curve).
- Take the copied helix and scale it up (in all three axes) by 1.25. Then create a cutting plane and place it approximately 1/2 turn into the scaled helix curve.
- Trim back the helix to the cutting plane.
- You now have the thread curves required to sweep your thread profile curves. Do not join the thread curves or helixes.
- Taking two of the thread curves (shown in cyan), use the "Sweep 1 Rail" command using the helix as the path. When prompted, choose the "Right Side" preview and select OK.
- Taking the last thread curve, again use the "Sweep 1 Rail" command using the connecting minor diameter curve of the thread surface you just created in Step 8. When promted, choose the "Follow Curve" preview and select "OK". Once completed, you can join all 3 surfaces together into 1 (this will close off the edges, assuring your thread surface won't have any bad edges to deal with).
- Repeat the same process as used in Steps 8 & 9 to create the disappearing thread surfaces.
- Taking the surfaces created in Steps 8 through 11, explode and then rejoin them into 1 surface. You now have your thread profile/cutting surface.
- Using your bolt profile you created in Step 1, rotate your bolt diameter circle 90 degrees on the Y axis.
- Move the rotated bolt diameter circle in the X axis -1/4 inch and create a 1" long cylinder using the "Solid - Extrude Planar Curve" command in the X axis.
- Using the "Solid - Differnece" command, subtract the thread profile/cutting surface from the bolt diameter cylinder.
- You should end up with a 3/8" dia. x 1" lg. stud with a 3/4" lg. thread length.
Bolt diameter cylinder can not be Booleaned if bolt cylinder end extends beyond the thread profile/cutting surface. The thread pitch helix curves can be joined to make a longer threads. For All-Thread studs, the stud diameter cylinder must remain smaller than the thread profile/cutting surface.
- Tom Rhino Newsgroup
Posted by
Robert
at
1/29/2007
0
comments
![]()
Labels: Rhino Tutorial, tenlinks.com
Rhino - Make a Die in 10 easy steps
- Turn on snap by highlighting "snap" on the bottom toolbar.
- Create a polysurface box (command "box") that is 10x10x10 units in size. You can use "Shade" and "RenderPreview" at any time to see how the design is coming along, try it now.
- Type in "FilletEdge" and select all 12 edges of the box. To change the default radius from 1.0 to 0.5, type in .5 and press space. Press enter to perform the fillet.
- Type in "Circle" and create a circle. Make this roughly 33% the size of the box. You can reposition objects wherever you want by highlighting them and left-click-and-drag. The example circle is hidden, to see it type in "Show".
- Type in "Scale2D" and squish your round circle along one axis to make it look like the demonstration. This is necessary because the indentations in the die are not exactly circular, they are more flat. You may have to temporarily disable snap to do this.
- Position the squished circle close to the surface of the die (but not touching) and center it on that side using all viewports. This will become the "1" side.
- Turn Snap off and Ortho on, this will help us place the circle with more precision. Notice the demo circle intersects the surface of the die by approximately two units in cross-section. Duplicate this, then turn Snap back on and Ortho off.
- Now that the "cutter" is positioned, it is a simple process of moving it and performing boolean operations to create the dents. Type in "BooleanDifference" and select the die and press enter, then select the circle and type in "d" plus a space to toggle DeleteInput to NO, then press enter. The intersecting area of the cutter and die is removed from the die and both objects remain.
- Side one is nearly done! Now rotate the box 90 degrees on any axis so we can get to another side, do this with the "Rotate" command. Notice how the dots are spaced on the die, and position the cutter to emulate this on your version. Perform more boolean differences and cut out the remaining indents on each side. Right-clicking in the viewport repeats the last command used, so try that instead of typing "BooleanDifference" a million times.
- Now that the die has the correct indentations in it, we need to break the surfaces up so they can have different materials applied to them. Highlight the die and type in "Explode," this splits the object up into its basic surfaces. Select all the dot surfaces, add them to a group with the "Group" command, and hide them with the "Hide" command. Then select all the exterior die components by dragging a selection box around the whole shape, careful not to select the cutter. Type in "Join", and the surfaces are recombined into one polysurface, minus the dots. Use "Show" now to unhide the dots.
- To assign the surfaces some materials, select the dots and press F3. Under "Layer," change this to the first colored layer and press enter. Ignore the colors. Select the Die and change its layer to #2. Right-click on "Default" on the bottom toolbar, this brings up the layers control panel. Here you can rename the layers and assign them specific materials. Make the die layer white-ish, and the dot layer dark-ish.
- Add a spotlight, table surface, and adjust render settings to your taste. Click in the Perspective viewport to make it active and type in "Render" to render the finished scene!
- Mark Rhino Newsgroup

Posted by
Robert
at
1/29/2007
0
comments
![]()
Labels: Rhino Tutorial, tenlinks.com
1/26/07
Rhino 4.0 - Print Line Thickness
Question
How can I print different line thicknesses for object edges and dimension lines? - John
Answer
In the layer dialog box there is a printwidth setting that allows you to choose various widths. (In version 4.) - Don Rhino Newsgroup
Posted by
Robert
at
1/26/2007
0
comments
![]()
Labels: FAQ, tenlinks.com
Rhino - Simple House
Using all SlabTools commands.
- PolyLine in plan
- Slab walls
- MoveSide adjust walls location & thickness
- SplitFace 6 splits
- MergeFace 4 merges
- split 4
- MoveEdge make angles in a wall
- PlyLine in elevation
- Slab roof
- MoveEdge adjust walls angle
- Make holes with booleanDifference
- MoveHole copy and move holes locations
- MoveSide adjust opening width
- PolyLine
- Slab make stairs
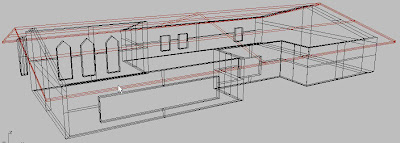
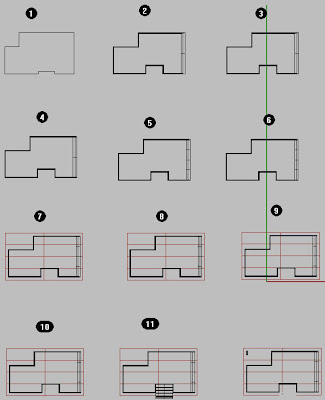
Posted by
Robert
at
1/26/2007
0
comments
![]()
Labels: Rhino Tutorial, tenlinks.com
Rhino Quatrefoil in a Gothic Arch
Path which would be the lobed shape and a cross section to sweep along it. Put a profile at each end then MatchSrf.
- Pascal Golay Rhino Newsgroup
Posted by
Robert
at
1/26/2007
0
comments
![]()
Labels: Rhino Tutorial, tenlinks.com
1/25/07
Join Two Rhino 3D Polysurfaces
Posted by
Robert
at
1/25/2007
0
comments
![]()
Labels: Rhino Tutorial, tenlinks.com
Rhino - Unfolding Surfaces
- Create the surface shape
- Rebuild surface and change control point number (to anything you need) and degree. UV to 1 or just one to degree 1 and the other to degree 3.
- Split the surface by isoparms using END OSNAP
- Flatter developable surface.
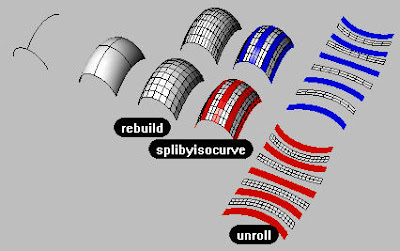
Posted by
Robert
at
1/25/2007
0
comments
![]()
Labels: Rhino Tutorial, tenlinks.com
Build a Scroll in Rhino 3D
- Use a background bitmap of your shape to trace the outline (PlaceBackgroundBitmap)
- Extrude that outline (Extrude cap=yes)
- Add another solid and boolean add it to fill in center part (BooleanUnion)
- Fillet edges. (FilletEdge)
Heath Rhino Newsgroup
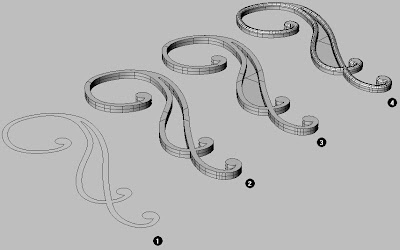
Posted by
Robert
at
1/25/2007
0
comments
![]()
Labels: Rhino Tutorial, tenlinks.com
1/23/07
Advanced Filleting on Rhino Wiki
There are situations where the automatic filleting tools in Rhino may fail. This page contains tutorials that show how to manually get the desired results.
- Creates a tangent surface between multiple polysurface edges (joined) with optional varying radius values, trims the original faces, and joins the resulting surfaces together.
- Is not limited to just two surfaces
- Can fill in corners between adjacent fillets
- Is limited to exactly three surfaces meeting at a point
- The radiuses used can not be so large that they overlap each other and completely consume any surface they are following.
- Creates a tangent surface between two surface edges (joined or not) with a constant radius, and optionally trims and/or extends the original surfaces.
- Works on exactly two surfaces at a time
- Does not fill in corners between adjacent fillets
| Four Surfaces | |
| | This example will show you how to manually fillet a corner where 4 planar surfaces meet at a single point. |
| Five Surfaces | |
| | This example will show you how to manually fillet a corner where 5 planar surfaces meet at a single point. |
| Overlapping surfaces | ||
| | This example will show you how to manually fix two overlapping fillet surfaces. | |
| Short walled pocket | ||
| | This example will show you how to manually fillet a pocket with the walls are too short for the desired radius. | |
| Existing small radius | ||
| | This example will show you how to use a large radius fillet when a small radius fillet already exists. | |
| Tangent Cylinders | |
| | This example will show you how to fillet two stacked cylinders that share a tangent side. |
| Overlapping boxes | |
| | This example will show you how to fillet the shared edges of two overlapping boxes. |
Posted by
Robert
at
1/23/2007
1 comments
![]()
Labels: Rhino Wiki
1/22/07
Turn one layer on and all other layers off
Question - How can I Turn one layer on and all other layers off. - William
Answer - OneLayerOn - James
Rhino Newsgroup
Posted by
Robert
at
1/22/2007
0
comments
![]()
Labels: FAQ
Emailing Rhino Files
Question - I'm having trouble emailing a model to a client. Our email limit is 5MB and my file is 63MB is there a easy fix? Matt
Answer - I would try SaveSmall. SaveSmall will not save render and analysis meshes, geometry only goes further and also tosses layers and annotaion and so on- a bit drastic. But, you might also want to see if you can Export the relevant geometry to a new file- it may be that there is a lot of reference geometry and so on that does not need to go along. - Pascal
---
Zip your file, as rhino files often shrink a massive amount when zipped. It's unlikely to make a 63mb file only 5mb, but no matter how you send it, it will be far faster if it's zipped. - Heath
Rhino Newsgroup
Posted by
Robert
at
1/22/2007
1 comments
![]()
Labels: FAQ
Brazil 2.0 for Rhino 4.0
** PLEASE NOTE - THIS IS WORK IN PROGRESS SOFTWARE **
USE AT YOUR OWN RISK.
Work-in-Progress (WIP) releases may crash, lock up, or corrupt files.
Rhino 3.0 and 4.0 Beta users are encouraged to download and try this work in progress release of the production quality renderer - Brazil r/s 2.0 for Rhino.
Brazil r/s 2.0 for Rhino WIP 13 is now available from
http://download.mcneel.com/brazil/2.0/wip/download_wip.asp
Please read the attached letter from Splutterfish with regard to Brazil 2.0 licensing. You will not be able to run Brazil for Rhino if you do not follow these instructions.
http://en.wiki.mcneel.com/default.aspx/McNeel/BrazilLicensing.html
Note: If you have already applied for a Brazil for Rhino beta license, you do not need to do so again - this WIP release will work with your WIP10 license.
This is an early version of Brazil r/s 2.0 for Rhino and is still quite incomplete. However, we are now nearing the beta stage of this product, and the most of the main features are now in place. This version includes a lot more work on the lights, and quite a few new materials and utility shaders. It is also fairly pointless using the WIP release to judge speed issues. None of the shaders or core are optimized for speed at the moment.
Posted by
Robert
at
1/22/2007
0
comments
![]()
Labels: Brazil News
Bongo 1.0 Service Release 3 RC3 - Rhino 4.0 Support
Bongo 1.0 Service Release 3 RC3 is now available from:
http://download.mcneel.com/bongo/1.0/beta/
Bongo 1.0 SR3 adds support for Rhino 4.0 Beta.
You will require your CD-Key to run the installer for Service Release 3. This key is printed on the license insert on the left side of your DVD case.
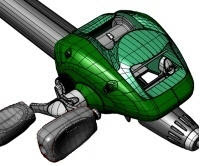
Note - This is a pre-release beta version of a new service release for Bongo 1.0. It includes Rhino 4.0 (Beta 7-Dec-2006 onwards) support along with several bug fixes and improvements. We recommend users who are experiencing problems with issues listed below to install this service release.
Posted by
Robert
at
1/22/2007
0
comments
![]()
Labels: Bongo News
Model DreamCAST in Rhino 3D
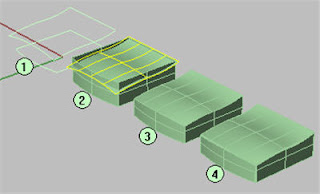
- Clean original curves (turn on points and compare to point count of your original lines)
- Use "sweep2" on top curves, using the two identical curves for the cross-section. Extrude the base curves. Not that the curves have not been filleted at this point.
- Trim these surfaces to each other, join, and cap (the cap is not necessary unless you want it to be "solid").
- Use "FilletEdge" with a .4 radius on all but the bottom edges.
Posted by
Robert
at
1/22/2007
0
comments
![]()
Labels: Rhino Tutorial, tenlinks.com
Rhino - Close a hole that is not planar
- Duplicate the surface edge.
- Split the resulting curve symmetrically.
- Use loft command to create the surface.

Posted by
Robert
at
1/22/2007
0
comments
![]()
Labels: Rhino Tutorial, tenlinks.com
Rhino Labs - In Place Block Editing Added
Rhino Labs has released a prototype in RhinoScript a "In Place Block Editor" for Rhino 4.0
- Edit: Select a block to edit.
- If the block is a single level block, the block is exploded and everything else is locked.
- If the block contains nested blocks, select the block to edit from a list. The selected block is exploded and everything else locked.
- Add to: Swaps the locked status of everything, which lets you select objects to add to the block. Copies of the selected objects are now unlocked and available for editing. Note: To move objects into the block rather than copying them, use the UnlockSelected command to free the objects for selection.
- Save: Uses all currently unlocked objects to redefine the block.
- Cancel: Restores everything to the way it was before the edit started.

Posted by
Robert
at
1/22/2007
0
comments
![]()
Labels: Rhino Labs
1/19/07
Metal Sculptures Designed in Rhino
Heath from Heath Satow Sculpture used Rhino to create animals in metal for the Denver Zoo. On the Rhino Newsgroup Heath says his favorite Rhino Command is UnRollSrf. Very nice work.
Posted by
Robert
at
1/19/2007
0
comments
![]()
Labels: Rhino User Story, tenlinks.com
1/18/07
Rhino Ring Tutorial
- Control points, symmetry and position were checked and adjusted in the original curves provided. Horizontal and vertical cutting planes were created and the intesecting points with the curves established. (shown green) - INTERSECT
- Use the green points to create 3 point arcs - ARC3PT, snapping to points.
- Create the straight line between the end of existing section curves as shown.
- MATCH the 'straight' curves to tangency with section cuves. Check preserve other end setting. Pick the cyan curve first and do not average curves. Join the two black profile curves.
- Use SWEEP1 to create a temporary bottom surface for the ring. Rail = (1), sections are arc sections created at stage 2.
- Create horizontal section curves in the surface near the bottom point. (Use SECTION in the active front view.) These curves will control the shape of the ring in the network later. For some reason I found that I needed to IMPROVE the lower curve before the network would work at stage 13. Find the intersection point between the horizontal cutting plane and the curve (2) Create a temporary short orthographic line from the intersection point.
- Create the BLEND curve (3) between the temporary line and the arc as shown. Delete the temporary line.
- Mirror the curves (2) and (3) as shown.
- Join the curves (2) and (3)
At this stage there are enough curves to proceed to the network surface. However the surface will not follow the original blue target inner edge curves too well in the upper section. This may not be critical. If it is you will need additional horizontal sections. I will create one. - Move the horizontal cutting plane to align with a critical position on the blue curves. Find the intersection points shown green and delete additional unwanted points that may be created.
- Use INTERPCRV to prduce a closed curve through the intersection points. (I started on line (2)) (Repeat steps 10 and 11 to create other section curves where you consider critical.)
- Split curves (1) and (2) at the intersection point between them.
- Use all of the green curves to produce a network surface.
- In the FRONT view use the blue curve to trim the surface.
- The result.
You dont actually need the blue inner edge curves. You can create the sections independently. - Example with new top shape.
The bottom section was replaced with a semicircle to give vertical tangents and the matched curves adjusted to tangency. Additional section curves were created using the hidden network surface and section command. The curves to create this network are on the network curves layer.
Once you you have a set of network curves you like you can create a new top face shape to vary the result. Split the resulting surface with a suitable sized cylinder.
With a network surface, curves don't have to touch. Experiment and see what happens.
Rhino Newsgroup

Posted by
Robert
at
1/18/2007
0
comments
![]()
Labels: Rhino Tutorial, tenlinks.com
Rhino 4.0 Page / Sheet Layouts
Rhino 4.0 tutorial that explains how to arrange, annotate and plot the model. Layout viewports are designed to do the following:
- Arrange several views of the model at different orientations
- Assign model scales to the detail viewport.
- Add annotations like title blocks and general notes
- Plot from this area 1=1, typically.

Posted by
Robert
at
1/18/2007
0
comments
![]()
Labels: Rhino Tutorial, tenlinks.com
Advanced Flattening - from Rhino Labs
Rhino Labs has announced an early prototype of a tool to flatten a non-developable (curved in two directions) 3-D mesh or NURBS surface into a flat 2-D pattern.
Expander from Ship Constructor for Rhino 3.0 does a good job of flattening but will not be available Rhino 4.0. Rhino Labs has developed a replacement. This is the first prototype.
Details on Rhino Wiki Link
Posted by
Robert
at
1/18/2007
0
comments
![]()
Labels: Rhino Labs
1/17/07
Rhino - Polygons to NURBS
How do I change a net of polygons to NURBS? Stefan
If the polygons are all coplanar, then DupBorder followed by PlanarSrf will get you a surface(s). MeshToNurb will make each polygon into a trimmed plane only useful if the model is quite simple in general. Beyond that, you can try T-spline in V4, I do not know if that will fill the bill in your case, or SMURF or of course more complex 'reverse engineering' surface building strategies using Rhino's tools. -Pascal
Posted by
Robert
at
1/17/2007
0
comments
![]()
Labels: FAQ, tenlinks.com
1/16/07
Rhino - File Locking
Question - Where can I found more information about File Locking? What is it and how is it used? Francis
Answer - In Options> Files there is a setting to lock files so that others opening the same file after you have it open will get it as 'read only' and will see a warning. Once you close the file, one or more other users on the network can open it with full access, depending on the settings in their Rhino for file locking. This is turned on by default I think. BTW, the later SRs of V3 have this as well. -Pascal Rhino Newsgroup
Posted by
Robert
at
1/16/2007
0
comments
![]()
Labels: FAQ, tenlinks.com
1/15/07
Internal Screw Thread
- Create white helix with one revolution.
- Copy white helix to make black helix.
- Make blue and red sections.
- Sweep1 red section about black path, use Roadlike Top.
- Sweep1 blue section about white path, use Roadlike Top.
- Array the two swept surfaces to make copies.
- Join all the copies.
- BooleanDifference them with purple block.
 - Bryan Rhino Newsgroup
Posted by
Robert
at
1/15/2007
0
comments
![]()
Labels: Rhino Tutorial, tenlinks.com
1/14/07
Flatten Surface
Question - Does anyone know how to spread out flat a surface in order to send the dimensions to a fabrication shop to cut the steel section out. - Rob
Answer - If the surface is developable as in your example, use the command Unroll developable surface (UnrollSrf) in the surface menu. -Mitch Rhino Newsgroup
Posted by
Robert
at
1/14/2007
0
comments
![]()
Labels: FAQ, tenlinks.com
1/12/07
Flamingo 3 Work In Progress 15 Available
http://download.mcneel.com/download_rel.asp?rel=220
There are no new features in this WIP, is it an expiration date update release. If you have Brazil for Rhino installed Flamingo 2.0 Wip 15 still wont run. For a complete list of future features http://www.flamingo3d.com/nr.htm- Facundo
Posted by
Robert
at
1/12/2007
0
comments
![]()
Rhino 4.0 Foreshortening Views for Fairing
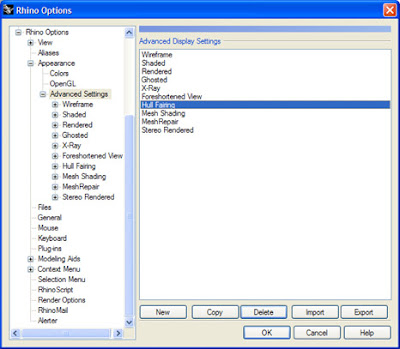
 In Rhino 4 we added the ability to forshorten any view. Along with the ability to add your own display styles. Follow these steps to create a new Foreshorten view style in Rhino.
To Create a new view Style in Rhino:
- Go to the Tools Pulldown, select Options.
- Under Appearance, select Advanced Settings.
- To the right you can select the Display Setting you like and then select Copy.
- At the top of the display mode change the name of the Display Mode
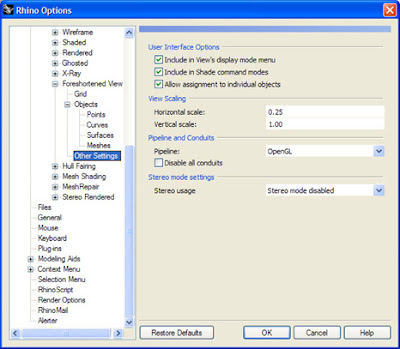
 To activate the Foreshortening in a display style:
- On the left of the dialog, go to Other Settings under the new Display mode you are in.
- Change the View Scaling that you want to use. For instance .25 in the Horizontal and 1 in the Vertical scale will forehorten the length of a boat to 1/4 its size.
- Press the OK button to save the style.
 To use the style in a viewport:
- In any view you are in, Right click on the View name.
- Select the the Display style you created
- The view should foreshorten.
Posted by
Robert
at
1/12/2007
0
comments
![]()
Labels: Rhino Wiki
Rhino - Modeling Infinity Symbol
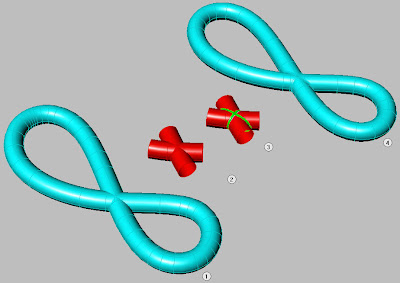
- Move the seam in the curve away from the intersection, make a Pipe or sweep profiles to make the infinity symbol. This is a pipe.
- Dup the surface and use SplitSrf to cut it up- delete the parts away from the intersection, leaving an X.
- Make fillets or blends etc, according to what you need to do, between the parts. Since there are now two parts you can get curves of intersection and trim away the inside parts to make a proper shell.
- Take the blends and trim them into the original, throwing away the 'X'.
Posted by
Robert
at
1/12/2007
0
comments
![]()
Labels: Rhino Tutorial, tenlinks.com
Rhino - Modeling a Faucet
- Step 2 - I have annotated the blend curves that more or less define the shape
- Step 3 - I have made two blend surfaces and one 2 rail sweep with curvature match to the edgerails ( I split up the faucet knob in 4 symetric parts) these surfaces will help to make a better patch surface in step 4
- Step 4 - I used the created six surface edges to make a patch
- Step 5 - delete all unneeded surfaces
- Step 6 - polar array and mirror the result of step 5 and join them into 1

Posted by
Robert
at
1/12/2007
0
comments
![]()
Labels: Rhino Tutorial, tenlinks.com
Rhino - Bend a Round Plate Then Unroll
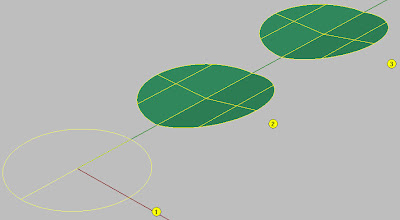
Any body tell me how do I bend this round plate in half 12 degrees then unroll for cutting purpose? I am trying to bend it at the line down the middle. I need to unroll so I can plasma cut this plate with notches. But it has to be bent and cut just right to fit the other piece that is in the drawing.
Answer:
- Split circle with straight line ("split" command)
- Create two semi-circle plates with "PlanarSrf", then select one half and use "rotate" and use the "end" snap to choose the first point (select the end of the split line) and then type in "12" for a 12 degree angle.
- Use "join" to connect the parts together
- Add whatever cuts you need, etc, then unroll. Warning do not explode before your unroll.
Posted by
Robert
at
1/12/2007
0
comments
![]()
Labels: Rhino Tutorial, tenlinks.com
Basic Jewelry Modeling in Rhino

Here is the link to download Basic Jewelry Modeling in Rhino. Your email address is required to download the 750,000 bytes 65 pages PDF and the Rhino .3DM tutorial file.
Posted by
Robert
at
1/12/2007
0
comments
![]()
Labels: Rhino News
1/11/07
Highest point on a Rhino curve or surface
I have a need to find the highest point on a curve or surface with the convex side up. Any idea how it could be done?
On a surface make a Silhouette in an elevation view then snap using Quad on the resulting curve. For a curve is the current Cplane is in elevation relative to the high point, then Quad will find X and Y direction extremes. - Pascal Rhino Newsgroup
Posted by
Robert
at
1/11/2007
0
comments
![]()
Labels: FAQ
Apply Rhino Curves from an Unrolled Surface
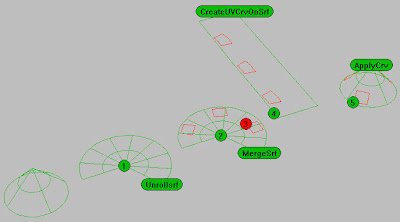
- Unroll the surface.
- If possible and where applicable MergeSrf the surfaces with Smooth =no.
- Put the pattern in place on the unrolled object.
- Use CreateUVCrvIOnSrf (V3Bonus tool, in V4 use CreateUVCrv) on the unrolled surface and the curves.
- ApplyCrv the rectangle and the pattern curves from step 4 to the original surface.
- Pascal Rhino Newsgroup
Posted by
Robert
at
1/11/2007
0
comments
![]()
Labels: Rhino Tutorial
Create a Rose in Rhino 3D
- Shape of one leaf as seen from front view
- Shape of the above leaf as seen from right view
- Crv2View using 1 and 2 splitting upper portion of the resulting curve (messy area) and connecting the parts with Blend command. Join all the pieces to get one curve and tweek the Cpoints to get something that you like.
- Flow command on curve 3 using curve 4 as new backbone
- Adjust the pointy end of curve 5 as you prefer...splitting and blending...or edjusting Cpoints...
- Patch command to get the surface...not too dense (isoparms) so that you ca still have a chance to adjust using Cpoints.

Posted by
Robert
at
1/11/2007
0
comments
![]()
Labels: Rhino Tutorial
GenoPal Color Rhino Plugin Free BETA
Found this new Rhino plugin posted on the Rhino Newsgroup.
You can now fine-tune the color of your products by exploring sophisticated colors. A simple mouse over on GenoPal™ swatch applies these colors onto the surfaces you have chosen.
Screenshot of GenoPal™ Plug-in for Rhino®
Posted by
Robert
at
1/11/2007
0
comments
![]()
Labels: Rhino Plugin News
1/10/07
Penguin 2 Beta 9
http://download.mcneel.com/?id=PE20BETA
It works for Rhino 4 beta from 12-11-2006.
- Works for Rhino 4 beta 11-Dec-2006 and up.
- Improved performance. Should be faster and consume less memory.
- Fixed a bug that made Penguin render dimensions and text even when the option was disabled.
- Fixed a crash bug that appeared when you defined individual settings to an
- object while having the Penguin display active.
- An object that was out of the view wasn't casting its shadow. This is fixed now.

Posted by
Robert
at
1/10/2007
0
comments
![]()
Labels: Penguin News
Carve a scoop out of a Rhino 3D Ellipsoid
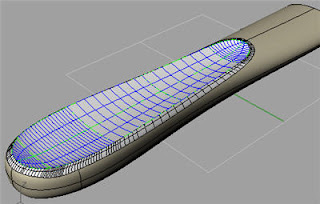
- Get significant curves from existing scoop polysurface and adjust back part to be straight (green group)
- Build a network surface (blue)
- Offset its border 0.05 (red) and trim upper body
- Blend the 2 surfaces Option 1.0 (continuity) on body border and Option 0.0 on network surf border
Posted by
Robert
at
1/10/2007
0
comments
![]()
Labels: Rhino Tutorial
Rhino 3D script to read a TXT file
! _ReadcommandFile should bring up a Open File dialog.
! _-ReadcommandFile "Path and file name"
Should open the file and read it. Note the dash (-) in front of the Readcommandfile in addition to the underscore (_) on the one that reads the file - this dash suppresses the dialog. File path and name should be in "double quotes" or spaces will not be handled as you expect.
- Pascal Rhino Newsgroup
Posted by
Robert
at
1/10/2007
0
comments
![]()
Labels: FAQ, Rhino Scripts
Bongo 1.0 Service Release 3 RC2

Bongo 1.0 Service Release 3 RC2 is now available from:
http://download.mcneel.com/bongo/1.0/beta/
Bongo 1.0 SR3 adds support for Rhino 4.0 Beta.
Rhino Newsgroup
Posted by
Robert
at
1/10/2007
0
comments
![]()
Labels: Bongo News
Rhino 3D modeling of a Closed Scroll
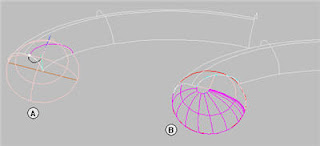
- Red - Curvature circle at endpint of surface edge.
- Brown - Lineperp to the edge curve across the circle.
- Green - Curve to revolve on vertical line (light green). This does not need to revolve on the endppoint od the other surface edge as it is here, it just seemed convenoient.
- Magenta curve Intersection of revolve and initial scroll surface.
- Blue line - Lineperp to green revolve profile.
- Black - CarcPt from magenta intersection curve to end of Blue perpline, then matched to blue for tangency- other curves will do as well.
- Brown - Finish
- Cyan - intersection curve and CarcPt joined.
- LtPink - revolve trimmed.
- Magenta - Sweep2.
- Trim and clean up mirror for the vertical half etc to make it closed.

Posted by
Robert
at
1/10/2007
0
comments
![]()
Labels: Rhino Tutorial
1/9/07
$2,400 Desktop 3D Printer Kit
The open source 3D printer kit was developed by fab@home.org and costs $2,400. I looked at the assembly drawings and it looks like a syringe is driven in the x and z axis by servo moters with constant pressure on the syringe plunger. The open source software reads STL files and communicates to the printer by USB.
Movie showing the 3D printer building a silicone bulb
Narrated overview movie of the Fab@Home Application
Posted by
Robert
at
1/09/2007
2
comments
![]()
Labels: 3D Printing
Change Rhino 3D Drawing Units
I always start a drawing and forget to change to inches. Is there a way to convert my drawing to inches after it is started?
You can change the units in the DocumentProperties>Units page and click No on the box asking if you want to scale the model. But it would be easier in the long run to start a new model (New command) and in the Open dialog, which will bring you to the template directory, choose the inch file and check the little box that says Use this file when Rhino starts. That way you will always fire up Rhino in Inches. - Pascal Rhino Newsgroup
Posted by
Robert
at
1/09/2007
0
comments
![]()
Labels: FAQ
Import CadKey into Rhino 3D
Export from CADKEY to .DWG files then import into Rhino 3D - Joules Rhino Newgroup
Posted by
Robert
at
1/09/2007
0
comments
![]()
Labels: FAQ
Model a Serrated Knife in Rhino 3D
- Make a Ellipsoid
- Then Array>Along Curve on Surface
- Then Boolean Difference

Posted by
Robert
at
1/09/2007
0
comments
![]()
Labels: Rhino Tutorial
1/8/07
How To Set The Number of Rhino Command lines
Pick of the Command window and drag it downwards with the mouse.
Rhino Newsgroup
Posted by
Robert
at
1/08/2007
0
comments
![]()
Labels: FAQ
Video Tutorial Creation Software
I enjoy making Rhino Video Tutorials with Camtasia and have a bunch over at rhino3dtutorials.com. Safak from the Rhino newsgroup suggested a few more.
Debugmode Wink
CamStudio
Camtasia
Captivate 2
Their are two types, true video recording and morphing between screen shots. I found that using the morphing/screen shot software the sound did not sync well with the screen. But it's very easy to create user interactive tutorials.
I like to have sound in my videos and went with Camtasia. I also like the ease of adding callouts and title screens. But if you not going to talk on your videos I would suggest Captivate 2.
Rhino Newsgroup
Posted by
Robert
at
1/08/2007
0
comments
![]()
Labels: FAQ
Why is everything considered a curve?
Don asked - I'm sure this has something to do with Nurbs, but can someone explain why
everything is considered a curve? (Or is at least everything 2D seems to
fall under the curve heading)
Safak answered- It doesn't necessarily have anything to do with NURBS. "Curve" is a more
general term than a line or a circle. Curve can be any inherently 1D (not
2D) object and can "accidentally" take the form of a line, an ellipse, a
rectangle, a trefoil knot,... etc. These other terms are not exceptions but
special cases.
In terms of dimensionality:
Point: 0D
Curve: 1D
Surface: 2D
Volume: 3D
...etc
You can draw a curve inside/over 1D, 2D, 3D, 4D... etc spaces/objects. You
can draw a surface inside/over 2D, 3D, 4D...etc spaces/objects. You get the
picture. Another way to think about is that a curve is a sweep of a point, a surface
is a sweep of a curve... etc. Safak Rhino Newsgroup
http://news2.mcneel.com/scripts/dnewsweb.exe?cmd=article&group=rhino&item=247047&utag=
Rhino Newsgroup
Posted by
Robert
at
1/08/2007
0
comments
![]()
Labels: FAQ
Model Tea Spoon in Rhino 3D 4.0 with Cage Editing
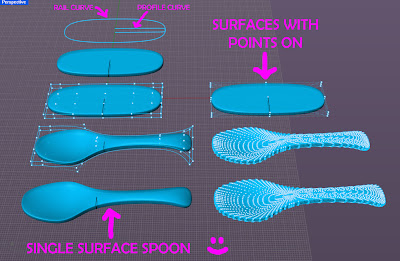
- Create a rail curve using "conic" rectangle from center
- Create a profile curve (vertical to Cplane) using "conic" rectangle from center
- Use "Rail Revolve" to develop the basic surface which will become the spoon
- Create a control cage for the surface. Use bounding box option is easiest.Here i set my control cage parameters to be X=7, Y=4, Z=2.
- Manipulate the control cage points with basic transformations. I only needed to use Move, Scale1D, Rotate, and Rotate3D to get the points were I needed them.
Posted by
Robert
at
1/08/2007
2
comments
![]()
Labels: Rhino Tutorial


