 I am hoping someone can help me... I am attempting to draw some decorative scrolls (similar to those in the attached picture), and was wondering if anybody knew the correct method to go about it. I can free hand sketch thedamn things, but they don't look so flowing when I'm interpreting them in Rhino.
Best of the Rhino Newsgroup
5/29/07
Decorative Scrolls
Posted by
Robert
at
5/29/2007
0
comments
![]()
Labels: Rhino Tutorial
VRAY Manual Available as PDF
 Vray for Rhino 4.0 Manual is available as a PDF on the VRAY forum. Registration is required to download. http://www.asgvis.com/index.php?option=com_smf&Itemid=90&topic=2213.0
Posted by
Robert
at
5/29/2007
0
comments
![]()
Labels: Rhino Plugin News
VisualARQ - Rhino for Architects
 Asuni CAD is happy to announce that the WIP 1 of VisualARQ, the new architectural plug-in for Rhino 4 is now available for download from www.visualarq.com.
Based on Rhino 4.0, our goal is to develop an application for Architects and Interior Designers that fulfils your needs and expectations. We are convinced that the best way to achieve that is with your help and listening to you.
Posted by
Robert
at
5/29/2007
0
comments
![]()
Labels: Rhino Plugin News
AuxPecker 1.0 - Rhino 4.0 Plugin
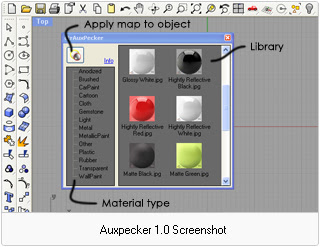
 Auxpecker is an easy and free solution to get a pleasing realtime preview of objects directly on the viewport of Rhino3D v4.0. It is simply based on the use of environment maps; making viewport objects reflect in ways that reproduce / approximate the look of various materials. This technique is not meant as a preview for rendering in association with any render engine. It is a stand-alone method for communicating very pleasantly, in realtime, projects to your client.
Auxpecker 1.0 come with a complete collection of pre-installed material maps and a plug-in for Rhino 4.0 allowing you an easier selection and us of the maps.
Roberts Review:A Free Rhino 4.0 plugin to make quick real time presentations. It applys materials to a Rhino Model, comes with a fair amount of materials. Note - you need to turn on viewport rendering (right click on viewport name and choose render.
For more detail http://auxpecker.blogspot.com/

Posted by
Robert
at
5/29/2007
0
comments
![]()
Labels: Rhino Plugin News
5/21/07
Tire Tread - Flow Along Surface
 I'm trying to create a tire thread. Have a tire, and threads, and try to flow the threads along the tire surface.
Best of Rhino Newsgroup
Basically it always wraps the wrong way around the tire. So it's wrapping the width of the threads as opposed to the height. Eg, the thread has 3 shapes horizontally but the 3 shapes repeats 50 times vertically. I want the 50 shapes flowed (that goes vertically) but it keeps wrapping the 3 shapes that is horizontal.

I tried to change the orientation of the threads by rotating them various
way along the X, Y, Z. I thought maybe it has to do with how they are oriented. But still no luck. - Less

----

Your tire blank is a single surface - you need to split it so that the tire tread area matches the base surface, like the yellow surface below. Also, you'll need to trim your base surface so that the treads line up at the seam so it won't have that gap.

You'll need to do both, but if those still don't get you all the way there, you can try swapping U and V using Analyze Direction. - Hans
Posted by
Robert
at
5/21/2007
![]()
Labels: Rhino Tutorial, tenlinks.com
5/18/07
Reverse Engineering with Rhino and a Digitizer
I purchased a used Faro arm to digitize our automotive parts & jigs, so we could get them into Alibre Design, and forward them for manufacturing. I purchased Rhino3 (and now 4 SR1 candidate1) after the demo, and have been using it to try to reverse engineering a front spindle, which is a pretty odd shaped forging (nothing very planar, other than the snout the hub goes over). The Solidworks/Dezignworks/Microscribe digitizer & modelling demos at trade shows make things look so easy, for a $10k combination of software.
The surfaces created from the digitize planar section curves have these very weird flares, twists, waves, and wrinkles. Rhino tech support suggested doing a Fair or FitCurve on the curves to simplify them. It helped quite a bit, but didn't eliminate them. How do you make a smooth, simple surface, that's still accurate? I'd offset the curves .125", but they're not always normal to the probe, so I'd introduce errors there. Once the surface is made, I then have a hard time averaging/blending/trimming the overlapping surfaces. What's the best strategy for that? Should I be using loft, or sweep2? If you guys don't mind sharing a workflow on how you digitize & create the part, I'd be grateful, since I'm sure I'm doing things the hardest way possible.
So far, my work flow has been:
- Digitize multiple points on all the flat surfaces, create a plane through the points, and offset the surface .125" to compensate for the probe diameter.
- Digitize multiple points for a few heights for bolt holes, and create "circle from multiple points". Create points at the centers of these circles, and draw a line for the hole axis. I usually draw a line connecting two quadrants of a top and bottom circle, and revolve that to make the hole ID or cylinder OD, and offset .125" for the probe dia.
- Use digitize planar sections to make a curves with point clouds. Often the curves don't quite "get it", and have these crazy fly-outs, which I then need to split, hit Point, click on the line, enter, click on the line again, and delete. Settings have been .05" between planes, and .02" point spacing, to help capture the detail.
- Create a surface with loft or sweep2, and offset it .125".
- Try to trim the surfaces and blend them, where I always get into trouble.
__________________________________________________________________
One trouble is, the shapes you have are not best represented, in terms of surfacing, by a series of parallel section curves. It might be better to look at the object and decide what surfaces you need, bearing in mind that there may be some useful 'underlying geometry' (like parts of cylinders or spheres etc that might not be obvious at first glance) that you can build and then trim back. Digitize points that will help you to get those surfaces. Also, transition surfaces that are obviously filleted edges say, I would not build into the initial surfaces, I would try to add these as edge fillets between the base surfaces- things like that. -Pascal Golay
Best of the Rhino Newsgroup
Posted by
Robert
at
5/18/2007
0
comments
![]()
Labels: Best of Rhino Newsgroup, tenlinks.com
5/10/07
How to approach fillets
- Get all the planar surfaces in place.
- FilletSrf at the two radii you want to use.
- Untrim the fillets and intersect the fillet surfaces with the top and bottom planes.
- Loft the resulting curves (Refit option due to incompatible curves), then trim and clean up, Join.
- Filetedge the edges that work.The front corners do not at .25 because the radius of the edge itself there goes down to about .18
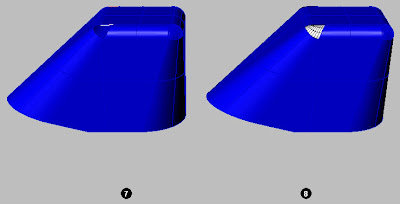
- Create Tangent blend curves between the edges of the fillets. The top oner needs to be adjusted so as not to bulge out too much (See the red and white curves)
- Trim back the surfaces
- Network surfaces matching for tangency.


 Rhino Newsgroup
Posted by
Robert
at
5/10/2007
0
comments
![]()
Labels: Rhino Tutorial, tenlinks.com
5/8/07
Cylinder In a Box
Draw the red line using osnap end on both corners of the cube, then use the cylinder command and the first point locate it in the osnap mispoint of the red line. The direction of the cilinder is relative to the view you are using for drawing it.
Rhino Newsgroup
Posted by
Robert
at
5/08/2007
0
comments
![]()
Labels: Rhino Tutorial, tenlinks.com
5/7/07
Design a Helmet in Rhino
Start with something like this. redraw the curves to get the exact shape you are looking for. Then use rail revolve, extrude both sides and split.
Rhino Newsgroup
Posted by
Robert
at
5/07/2007
0
comments
![]()
Labels: Rhino Tutorial, tenlinks.com
5/3/07
Build a Road in Rhino 3D
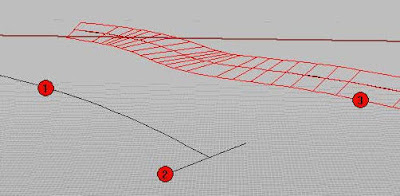
- Mid line of road
- Horizontal line perpendicular to curve '1' - representing road width.
- 3 sweep1 surface created in with the roadlike top option.
- Instead of a straight line for the the road width you could substitute a real road section.
 Rhino Newsgroup
Posted by
Robert
at
5/03/2007
0
comments
![]()
Labels: Rhino Tutorial, tenlinks.com
5/1/07
Create a connecting surface to two pipes with the same cross section area
First I divided the pipe into 4 parts, two pairs of symmetrical pieces. Then I built the red and blue curves for the initial loose loft. Loose loft is the easiest way to controllably guarantee continuity in simple cases. The blue lines are actually degree 2 curves with the middle control point weight matching the arc middle control point weight to make sure all iso curves in the resulting surface will be nice and straight.
Then I built the initial Loft with Loose option, and extracted a section in the middle and built a planar surface from it. Used the area (about 315) and the target area (308) to calculate a scale factor (about 0.97) for the section curves. Scaled the section curves (magenta) and finally built another loose loft from all the curves. The cross section area is 308 dot something all the way.
Rhino Newsgroup
Posted by
Robert
at
5/01/2007
0
comments
![]()
Labels: Rhino Tutorial, tenlinks.com